DIY Holiday Crafts
If you want to give something more personal than a store-bought gift and you haven’t been knitting wool scarves since July, we have a couple of ideas for even the most craft-challenged and busiest readers. The following homemade gifts look more complicated than they really are. Bonus item? No knitting or sewing skills required!
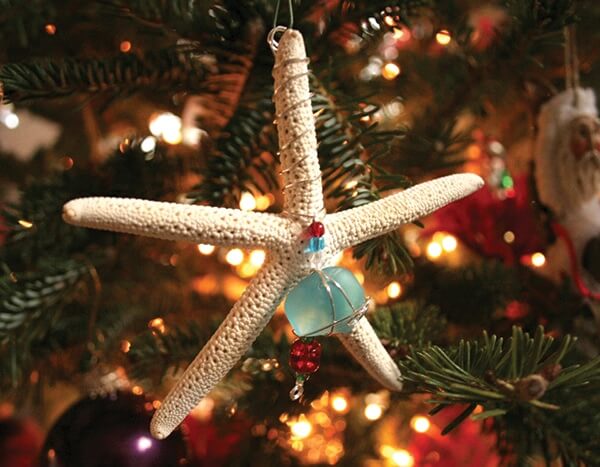 Sea Glass Starfish Ornament
Connect your love of the beach and the symbolism of the Christmas star with handmade starfish ornaments. These can be easily made out of wire, sea glass, beads and a starfish (also known as a Sea Star.) In addition to being used as Christmas ornaments, they can be used to decorate other gifts.

Materials List:
- Large starfish (ideally 4-10 inches wide, available at craft stores and shell shops)
- Sea Glass or tumbled glass (available in craft stores, or if you’re fortunate, on the beach)
- Assorted beads with holes large enough to accommodate wrapping wire
- Wrapping wire (Softer than normal wire, it’s easily manipulated and cut without special tools. Available in the jewelry supply aisle.)
- Assorted ribbon
- Needle-nosed pliers (optional)
STEP 1
Cut a length of wire about 9-10 inches long for the average 5-inch starfish. Add an additional inch of wire for every extra inch of starfish. Cut a length of ribbon between 3-4 inches.
STEP 2
With a pencil or chopstick wrap one end of the wire around 3-4 times (this will make the top coil loop for the ornament to hang from). Place the wire behind the starfish and start wrapping in a diagonal down the center “finger” of the starfish.
STEP 3
When you reach the center, wrap the wire diagonally around the corners of the starfish. At this point, string a couple beads and then start wrapping around the glass.
STEP 4
Once the glass feels secure, wrap the wire behind the starfish, come over the top to the front. Then thread the wire behind the glass. This part of the wire should hang in the middle below the glass. String on a few more beads and make another small coil loop at the bottom to hold them in place. Snip off any extra wire.
STEP 5
Thread ribbon through the top loop and hang!
Remember this is all free-form and you can wrap the glass and the wire however you like. Because the size of the starfish and the shape of the glass will always vary, each finished ornament will be unique. Variation: For even more swirls, cut a second length of wire, the same size as the first. Starting in the center, begin wrapping from the top of starfish’s middle arms and work your way down. When you reach the bottom, you can wrap more glass in place with the wire and finish it off with another swirl.
Kid’s Craft – Winter Wonderland Snowglobe
 Kid’s crafts get a bad reputation for either screaming “a kid made this” or “an adult made this but it’s signed by a child.” Here is a suggestion that will look like neither. It all starts with a globe kit or a recycled jar. Check your cabinets for those too-pretty-to-throw-away jars from gourmet food gifts and transform them into a homemade snow globe if you do not want to use a store-bought kit. Personalize the gift by making it that child’s favorite cartoon character or perhaps an ornament from the recipient’s childhood. We recommend adult assistance during the epoxy application but the rest is truly a child’s craft.
Materials List:
- Snow globe kit from crafting stores (or you may choose to up-cycle an ornamental jar with secure lid)
- Plastic or ceramic figurine or ornament
- 2-3 Tablespoons of glitter or iridescentsnow from globe kit
- Enough distilled water to fill jar
- Waterproof epoxy
- 3-5 drops of glycerin*
- Acrylic paint (optional)
- *Glycerin is a food additive used for restoring the consistency of icing. It is available wherever cake decorating supplies are sold.
STEP 1
If choosing to paint the lid or figurine, complete this first step well in advance to allow time for drying. Also, if you are not good at estimating how much liquid your figurine will displace, now is the time to place your figurine in the globe with water and mark the desired fill line on the outside.

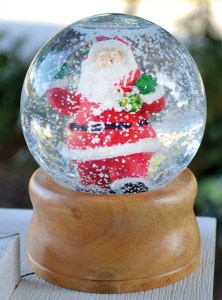
Lily Shelton, 11 (on left) and Carrietta Classen, 12, proudly display their handmade Santa globe.
STEP 2
Once the paint is dry, an adult should use the epoxy to stick the figure to the inside of the globe’s base. Epoxy is used instead of other waterproof glues because of its fast drying time.
STEP 3
While the epoxy is curing, fill the globe with distilled water and add four or five drops of glycerin to distilled water. (Glycerin causes the snow to fall slower; distilled water prevents the snow globe’s liquid from turning green.) Fill the globe almost to the top, leaving a ¼ -1 inch space between for air, depending on size of your figurine. The air bubble aids in helping the ‘snow’ fall correctly.
STEP 4
Add between 1-3 spoonfuls of glitter depending on the size of your globe and stir. The stirring helps the glitter from sticking to itself.
STEP 5
Once the epoxy has completely set and the globe is filled with all the ingredients, screw the lid on tightly. Whether or not you want to seal the lid with more epoxy is up to you. Then, flip the jar over and watch as the snow falls around your figure.Your winter wonderland is done. Let it snow!
Travel Tip – Travelling for the holidays? Keep in mind that TSA will consider the fluids inside your snow globe as part of your 3.4 ounce carry-on limits.
Mercedes Tabano II is a writer and E-content specialist. She has appeared in Outer Banks Child, Women with Know How, and Brass Magazine.

Author: CoastalLife
